Update! I've decided to submit this to the Pinterest challenge after all. Even though I did this merely days before YHL even announced what they were doing. So for once, I did not copy them! Although I did get a little giddy at the thought that I did a project first and they did the same shortly after. Virtual nail gun clinks all 'round! :)
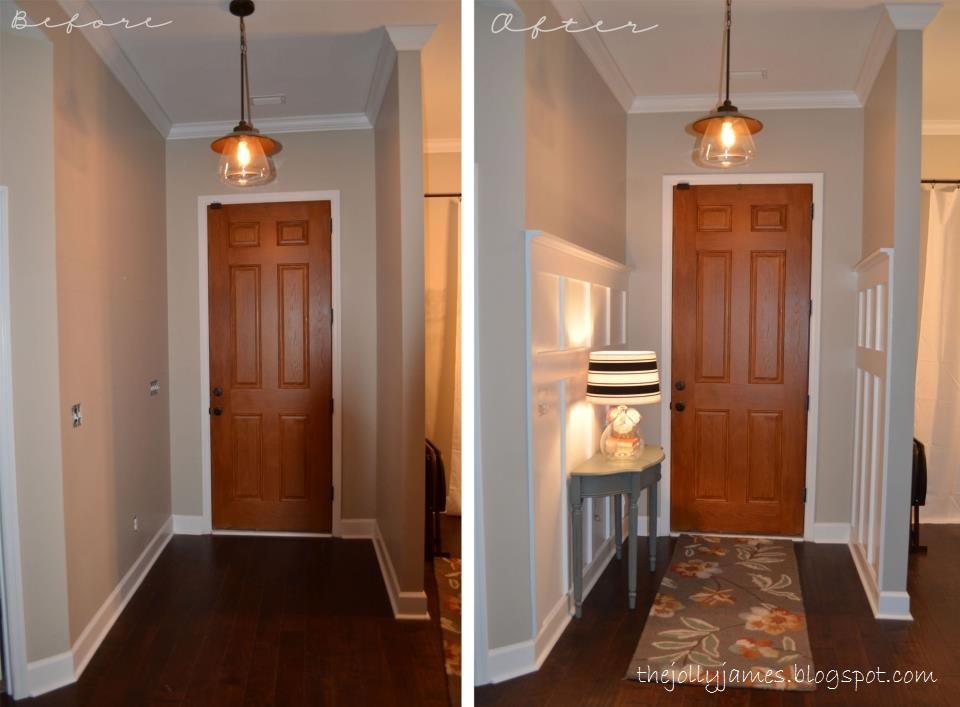
Ladies and gentleman may I introduce you to my favorite project to date! I’m pretty sure I say that with each project but there’s nothing wrong with them all being my favorite!
And by favorite project I should specify that its my favorite
end result. By no means was this my favorite project to actually
do. In fact it was kind of not fun, but that’s besides the point!
So, David was out of town a few weekends ago for one of his best friend’s bachelor party. All the guys rented a cabin in Blairsville, GA. They got to see a little bit of snow! I was jealous. Not of being stuck in a cabin with a bunch of boys, but I’ve been hankering for a snowy/cabin/mountain trip for a while now. But I’m glad my babe had fun!


Anywho, what did that mean for me? Project time!
Earlier that week we bought stuff to do board and batten for the laundry room.

Then, the afternoon before I was to get started on the project, I had a lightbulb moment!
Why am I doing this in the laundry room where no one but us will ever see it…I know! Let’s do it in the foyer where everyone will see it and we can enjoy it!
So, a call to the hubs indicating I’d (as expected) changed my mind, and he was on board.
“Whatever you want to do my love”
(He’s finally learned the right answer)
He was heading out of town early the next morning and I needed a few more boards to do the now expanded project. It was never planned that I would do this project alone, but it worked out that way because I was way too impatient to wait for him to get back from the mountains!
Mom had a minor surgery that Friday so she came to stay with us Friday night while my Dad was at work. David left Saturday morning and my Dad ended up having overtime Saturday night, so she ended staying all weekend. It was fabulous! She has her own room and bathroom at our house that she has now stocked with supplies so she doesn’t have to pack anything but clothes when she comes.
The guest room has now been deemed
Weezer’s Room. (Her future Grandma name FYI!)
Anywho, we were great company for each other because she laid on the couch all weekend recovering, watching movies and watching me work. She was an excellent assistant decision maker when I couldn’t decide what I wanted so it was great having her there!
Alright so this project took me an entire weekend starting around 11:00 on Saturday and ended about 5:00 Sunday. Not too shabby for a one woman operation!
It’s perfectly imperfect and I absolutely LOVE it. It’s pet-worthy.
It could have been sanded and filled better, but I did what I could with the tools (and patience) I had.


Before and After
Light switch plates have since been added after some custom fittings because I measured wrong…thank you Dad!
 Hooks were added to the right side more recently!
 Don’t mind the “finished” photos from the phone…sigh…
There are tutorials everywhere for this so you can Google around for exact directions, but I based mine off of a pin from
Being Brook’s Tutorial.

Gorgeous right?
The only thing I really changed was that I did a 1x3 on the top instead of a 1x6. I also added shoe molding and put my lower 1x6 more in the top third versus the middle.

I cut everything with David’s battery operated saw and some sawhorses. I nailed everything with my Dad’s battery operated nail gun.

First of all I did a super quick & easy rendition in Paint to get an idea of what it would look like visually. In the practice picture I brought it around the corner but Mom helped me decide that wasn’t best. I totally agree!


I primed the walls first.

Then I cut. And cut. Oh, and then I cut some more.


And I nailed everything together. Piece by piece. It came together like a puzzle.

Then I caulked, puttied and was ready to paint!
I didn’t want to do anything with changing out the (brand new) baseboards so I angled the bottoms at a 45 degree so the vertical pieces did not hang over the base board.
I then painted two coats and called it a day!
I haven’t done much decorating yet as far as wall stuff, but I’ll share when I do.
I am in love and SO happy I did this in the foyer. I stare at it every day!
And with this free makeover to some baskets I had, I now have a super cute decorated foyer table!


Oh and check out
Katie,
Megan and
Michelle to see their awesome projects too!